Create New Webhook
First of all you need to select the Blynk.Console event that will trigger webhook execution. Your selection will define the set of fields necessary to set up the webhook.
Webhook Trigger Event – the following triggers are available:
Template Datastream Update
Device Datastream Update
First-Time Device Connection (only for Business plan)
New Device Activated By User (only for Business plan)
New User Added (only for Business plan)
User Account Deleted (only for Business plan)
User Metadata Updated (only for Business plan)
New User Sign-Up (only for Business plan)

Webhook Name – Use only letters, digits, -, ' and spaces up to 80 characters.
Template (or Device if you chose that option) – select the template from the dropdown.
Datastream - select datastream the webhook will be working with
Webhook URL – input webhook destination https:// link
Request Type – select supported HTTP method:
Post – create
Get – read
Put – update
Delete – delete
Content Type – switch to one of supported webhook request content type:
Web Form Fill the corresponding fields. Add as many rows as you need – once a row's fields are filled the Add row button appears. Hover right to the row to make Delete button visible (at least 2 rows needed for it to appear).
Custom JSON
Code Input field – input your code here. Objects input can be sped up by selecting from Dynamic Data list (quick search is also supported)
Dynamic Data
Search – objects quick search
Placeholder list – scroll and select the object(s) you want to add to your code
Plain text
Text Input field – input any text you want to send. Objects input can be sped up by selecting from Dynamic Data list (quick search is also supported)
Dynamic Data
Search – objects quick search
Placeholder list – scroll and select the object(s) you want to add to your code
Authorization Method (optional) – select corresponding Authentication Type in case your destination requires authorization.
Authentication Type – switch to one that is required by your destination:
None is set by default
OAuth 2.0
Client ID
Client Secret – you can click view/hide eye pictogram to be sure it's correct
Token URL
Basic Auth
Username
Password – you can click view/hide eye pictogram to be sure it's correct
HTTP Headers (optional) – you can add them to your request
Key – type any meaningful key. 100 characters limit
Value – Use only letters, digits, spaces, /, _, :, ;, . and -
Failure receivers (optional) - select users who will receive the notification on webhook failure
Send failure email after this number of failures - input the number of unsuccessful attempts
Test Webhook – click this button to test the webhook before saving. The result with response code will replace the button. If something is missing in the webhook form – the field will be highlighted.
Cancel – closes webhook form. Please note that all the inputs made will be lost.
Create Webhook – click to save the webhook you created

Placeholders that can be used for dynamic data
There is a number of dynamic data objects that can be used to pass data through webhooks. The placeholders get sorted out automatically. So, if an item is not accessible through the dropdown menu or a search query, it is not available for this specific trigger.
device_id - send device id
device_name - send device name
device_authToken - send auth token of the device
device_templateId - send template id
device_productName - send template name
device_orgName - send organization name
device_dataStream_X where X is data stream identifier - value of device data stream. Example: {device_dataStream_1}
device_dataStreamId - send id of the datastream
device_dateCreated - send device creation date
device_pin - send current pin of datastream
device_pinValue - send current (last) pin value of datastream
device_pinValue[X] - send multiple values in a single pin
device_clientType
device_country
device_state
device_zipCode
device_metadata_X where X is metadata identifier - value of device metadata. Example: {device_metadata_1}
device_tags - comma-separated device tag names.
timestamp_unix - timestamp of webhook triggered in epoch format
timestamp_iso8601 - timestamp of webhook triggered in ISO8601 format
user_id
user_object
user_email
user_name
user_orgName
user_dateCreated
user_roleName
user_title
user_nickname
user_phoneNumber
user_country
user_state
user_zipCode
user_assignedTags
user_ownDevicesCount
user_devicesCountByProductName
Blynk support multiple values in a single pin
Type of datasream should be only string, method GET
Use in sketch
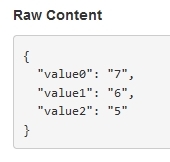
Blynk.virtualWrite(V17, "7", "6", "5");
Custom JSON:
Result after triggering webhook:
Trigger a webhook from the hardware
For triggering a webhook, use Blynk.virtualWrite in your firmware.
Refer to the documentation for more info about sending data to virtual pins.
Last updated
Was this helpful?


